みらい翻訳のバックエンドエンジニアのtoshと申します。
現在弊社ではマイクロサービス間のメッセージング基盤として、Kafkaの構築を検討しています。 マイクロサービスで開発するに当たって、メッセージング基盤がなぜ必要なのか、どのように使われるのかはredhatさんのこちらの記事が参考になります。
弊社内では主にマイクロサービス間の主な連携手段として非同期メッセージングを採用したく、現在技術検証を進めている最中です。
Kafkaを構築するには様々な方法がありますが、その中でもお手軽かつ高速に構築が可能である Confluent Cloudを試してみたいと思います。
Confluent Cloudとは
Confluent CloudはConfluent社が提供しているフルマネージド型のKafkaのクラウドサービスです。
通常、Kafkaを構築する際には事前に綿密なキャパシティプランニングが必要です。 また、RDBMS等のミドルウェアと比べると運用経験者も少なく、商用環境に採用をしたくても運用面での課題がある場合があると思います。
Confluent Cloudはパフォーマンス等の要件を元に適切なクラスターを選択する方式であるため、複雑なキャパシティプランニングを省略できます。
また、バージョンアップをConfluent側で実施するため、運用の負荷を削減することができます。バージョンアップはゼロダウンタイムで行われます。
実際に試してみる
※Confluent Cloudは無料でアカウント作成はできますが、クラスタを使用すると料金が発生するため注意してください。
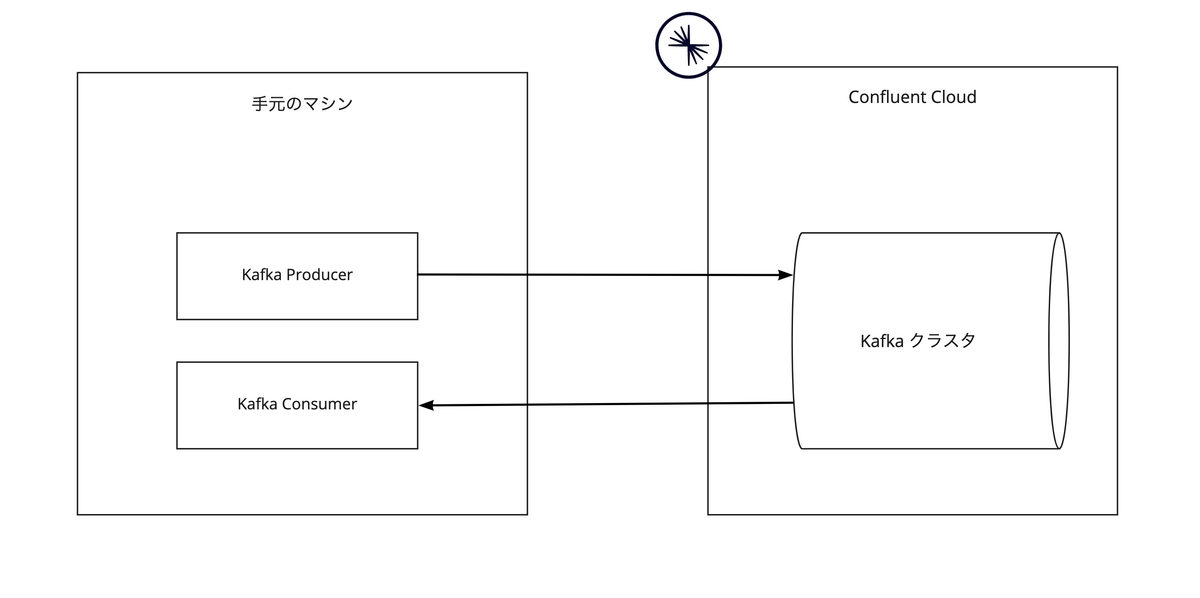
今回は下記のようなシステムを作ります。
それでは早速試していきたいと思います。
まずはアカウントを作成後、下記のリンクを参考にCLIツールのインストールをしておきます。
Install Confluent CLI | Confluent Documentation
認証
インストールが完了したら、以下のコマンドを使って認証をします。
$  confluent login
Enter your Confluent Cloud credentials:
Email:
Emailを入力後、ブラウザが起動するので、認証をしてください。
environmentの作成
Confluent Cloudではenvironmentを使って環境を分けることができます。 組織のデフォルトは自動で作成されますが、今回はenvironmentを新規作成したものを使ってみようと思います。
認証後、以下のようにenvironmentを作成します。(既にあるenvironmentを使っても構いません)
$ confluent environment create test
+------------------+-----------+
| Environment Name | test      |
| ID               | env-xxxxx |
+------------------+-----------+

$ confluent environment list
      ID      |  Name
--------------+----------
  * env-xxxxx | default
    env-xxxxx | test
今回はtest environmentを使用しますので、以下のコマンドを実行します。
$ confluent environment use ${test environmentのID}
Now using "env-2m1r1" as the default (active) environment.
bash-3.2$ confluent environment list
      ID      |  Name
--------------+----------
    env-xxxxx | default
  * env-xxxxx | test
クラスタの作成
environmentを切り替えたので、次にクラスタを作成します。
confluent cluster コマンドというそれっぽい名前のコマンドがありますが、Confluent Cloud を使用する場合は confluent kafka cluster コマンドを使用します。
Confluent Cloudのクラスターは3種類ありますが、今回はBasicを使用します。
実際に運用する際には、要件に合わせて適切なCluster Type*1を選択する必要があります。
今回はローカルから接続するサンプルであるため、完全に従量課金であるBasicを使用します。
(クラスター作成時にクラウドプロバイダとしてAWS、リージョンに東京リージョンを指定しますが、クライアントはローカルで起動するためあまり意味はありません)
$ confluent kafka cluster create sample_cluster --cloud aws --region ap-northeast-1 --availability single-zone --type basic -o yaml

api_endpoint: https://xxxxxxxxxx.ap-northeast-1.aws.confluent.cloud
availability: single-zone
egress: 100
endpoint: SASL_SSL://xxxxxxxxxx.ap-northeast-1.aws.confluent.cloud:9092
id: lkc-xxxxxx
ingress: 100
name: sample_cluster
provider: aws
region: ap-northeast-1
rest_endpoint: https://xxxxxxxxxx.ap-northeast-1.aws.confluent.cloud:443
status: UP
storage: "5000"
type: BASIC

$ confluent kafka cluster list -o yaml
- availability: single-zone
  id: lkc-xxxxxx
  name: sample_cluster
  provider: aws
  region: ap-northeast-1
  status: UP
  type: BASIC
クラスターの作成が完了しました。ちなみに confluent kafka cluster create コマンドは実行後すぐに完了します!素晴らしいですね。
API Keyの作成
次にAPI KEYを作成します。
$ confluent api-key create --resource ${クラスタのID} --description "Created by CLI" -o yaml
key: xxxxxxxxxxxxxxxxxxxx
secret: xxxxxxxxxxxxxxxxxxxxxxxxxxxxxxxxxxxxxxxxxx
作成したAPI KEYはあとで使うので保存しておいてください。
データの送受信
ここからローカルでクライアントを動かして、実際にデータの送受信をしてみます。
クライアントは Confluentが公開しているもの を使います。様々なサンプルがありますが、今回はJava クライアントを使います。
まずは こちらを参考に、ローカルにクローン後ビルドします。
$ git clone https://github.com/confluentinc/examples
$ cd examples
$ git checkout 7.0.1-post

$ cd clients/cloud/java/

$ mvn clean package
ビルド後、以下のコマンドでconfigファイルを作成します。(Schema Registryに関するWarningが表示されますが、今回はSchema Registryは使わないため無視します)
$ confluent kafka client-config create java --cluster lkc-xxxxxx --api-key xxxxxxxxxxxxxxxxxxxx --api-secret xxxxxxxxxxxxxxxxxxxxxxxxxxxxxxxxxxxxxxxxxx > java.config
Warning: created client configuration file but Schema Registry is not fully configured.

Reason: Schema Registry not enabled

Suggestions:
    Schema Registry must be enabled for the environment in order to run the command.
    You can enable Schema Registry for this environment with `confluent schema-registry cluster enable`.
    Alternatively, you can configure Schema Registry manually in the client configuration file before using it.
まずはデータの送信を実行してみます。トピックは自動で作成されるため事前に作成する必要はありません。
$ mvn exec:java -Dexec.mainClass="io.confluent.examples.clients.cloud.ProducerExample" -Dexec.args="java.config test1"


...........

Producing record: alice    {"count":1}
Producing record: alice    {"count":2}
Producing record: alice    {"count":3}
Producing record: alice    {"count":4}
Producing record: alice    {"count":5}
Producing record: alice    {"count":6}
Producing record: alice    {"count":7}
Producing record: alice    {"count":8}
Producing record: alice    {"count":9}
Produced record to topic test1 partition [3] @ offset 0
Produced record to topic test1 partition [3] @ offset 1
Produced record to topic test1 partition [3] @ offset 2
Produced record to topic test1 partition [3] @ offset 3
Produced record to topic test1 partition [3] @ offset 4
Produced record to topic test1 partition [3] @ offset 5
Produced record to topic test1 partition [3] @ offset 6
Produced record to topic test1 partition [3] @ offset 7
Produced record to topic test1 partition [3] @ offset 8
Produced record to topic test1 partition [3] @ offset 9
10 messages were produced to topic test1

...........
データが送信されたことがログからわかると思います。
次にデータの受信をしてみたいと思います。
$ mvn exec:java -Dexec.mainClass="io.confluent.examples.clients.cloud.ConsumerExample" -Dexec.args="java.config test1"

.................

Consumed record with key alice and value {"count":0}, and updated total count to 0
Consumed record with key alice and value {"count":1}, and updated total count to 1
Consumed record with key alice and value {"count":2}, and updated total count to 3
Consumed record with key alice and value {"count":3}, and updated total count to 6
Consumed record with key alice and value {"count":4}, and updated total count to 10
Consumed record with key alice and value {"count":5}, and updated total count to 15
Consumed record with key alice and value {"count":6}, and updated total count to 21
Consumed record with key alice and value {"count":7}, and updated total count to 28
Consumed record with key alice and value {"count":8}, and updated total count to 36
Consumed record with key alice and value {"count":9}, and updated total count to 45

.................
データの受信が確認できました。
ログインからここまで、10分もかかっていないです。非常に高速に動作確認をすることができました。
まとめ
Confluent Cloudを使うことにより、高速にKafkaを構築することができます。 また、Kafkaの構築・運用負荷を削減することができます。
みらい翻訳ではエンジニアを募集しています
みらい翻訳ではエンジニアを募集しています。ご興味のある方は下記リンクからお問い合わせください。